Friday, July 31, 2009

One card base can become many styles...


I'm sharing a few examples of cards I worked on this week while recovering from knee surgery. I used simple bases with scrapbook papers I had on hand, and then made multiple styles of cards from them. It's so easy to do, I only had one stamp set by the bed, that was the Warmest Regards sentiment stamps. In the first examples, I used the exact same card stock color for both cards and made 2 very different cards, starting with simple torn paper. One is more masculine, where I added some simple hardware, a couple of extra layers of paper, and a sympathy sentiment. The other, quite feminine, has an accordion style flower (instructions available in the resources section at Splitcoaststampers) and a thank you sentiment.
This is a close-up of the accordion style flower.

I also made 3 cards using the same style base, but varied the color of the cardstock for the card base, and then varied the front decor. See examples below.

On one I added a simple brown felt flower to a scallop circle and a blue brad that matched the light blue cardstock. On the second one, I added a striped paper, white cardstock for the sentiment, and some antique copper brads, the base in a darker blue.
On the last example, I added a Thank You oval with a scallop oval behind, and created a scallop circle flower using a circle punch, scallop circle punch, and oval punch(leaves). I did the card base in Blush Blossom, and I curled out the petals of the flower for depth.

I will be so glad when I can work on some more complex projects again, but for now my knee must rest. Hope you enjoy the creations!

Tuesday, July 28, 2009

Thank You gift (monogram note cards) and a Birthday Card

So a few weeks ago our youngest ended up in the hospital OR getting her tongue stitched up. It is a long story, but what happened in the background is what really needs sharing. I called a dear friend, Nicole, and asked her to pick up our other daughter from school. Not only did she do that, she fed her dinner, bathed her, let her experience her first sleepover (with her daughter), took her to the pool the next morning, and bought her lunch before bringing her home. She went above and beyond what we needed, in order for us, and the baby, to recover from the incident.

I needed to do something to thank her. So I decided that even though it's not sufficient for all she did, I would make her some monogrammed note cards. I am hoping that she'll be able to use them either for school or personal use. I used some retired Stampin' Up designer series papers, cardstock in So Saffron, ink in Mellow Moss for the monogram (used my JustRite Monogram stamp in Curlz), as well as some Chocolate Chip and Very Vanilla cardstock for some accenting. I also monogrammed the flap on the Very Vanilla envelopes that will accompany the note cards. I held on to this project (probably) a little too long, but knew that I'd be having knee surgery and laid up in bed wanting to do stuff. So this was the perfect time for me to spend working on it. I hope she enjoys them!
This week also marks a milestone birthday for my friend Gil (pronounced Jill) who is a coworker of mine. She's an awesome team member, and I made this card for her last week in preparation of being out of the office. I hate that I will not be there to see her on her 40th, but will still be there in spirit!!! Happy Birthday Gil!
I made her this card, which is 5.5x8.5 folded (1 sheet cardstock folded in half). I used some great scrap paper and stamped the flowers from Inspired by Nature in red chalk ink. I added a tag that I distressed with Close to Cocoa ink and stamped the sentiment from It's About Time and the word Celebrate from Wonderful Words in Chocolate Chip. I added brown grosgrain ribbon and a tiny clip. Inside a simple Happy Birthday sentiment from Warmist Regards (stamps for this project all by Stampin' Up!). My favorite part of this card, which you can see best on the close-up shot, is the sewing. I ran the striped paper through the sewing machine, sewing it right onto the Real Red cardstock, purposely doing the jagged lines, and going around the card twice. I curled up the edges just slightly, as well. Hope Gil likes her card and has a fabulous 40th!

Monday, July 20, 2009

Free Music and a Picnic Dinner! I love summer!

One of my favorite things to do in the summer isn't going to the beach or the pool, but packing a picnic dinner and going to the Sunday In The Park and hearing great music. I think it's because I've always just loved music, and it's a great way to spend time with the family. Last night the band Asheville-based Uncle Mountain played, they were great!

Sometimes it's great to just pick up dinner somewhere, but other times I really love coming up with the ultimate picnic dinner! Fresh foods are at the top of my list, such as fruit salad. What better time of year, when most fruits are in season and you can get them fresh from the local farmers market.

Last night I chose things that we had as leftovers or staples from the pantry to create this salad, it turned out really good, so I thought I'd share. As I always say, modify this to suit you or your family best!
Picnic Salad

2 cups Spinach Leaves
3 ears leftover corn on the cob, cut off the cob
2/3 can black beans, rinsed and drained
2 cups chopped/pulled chicken breast
1 cup tomatoes, seeded and chopped
1/2 cup feta cheese
dressing of your choice (We chose Italian)

Serve with some whole grain artisan bread and fruit salad. Happy summer!

Wednesday, July 15, 2009

Organizing your weekly menu and food needs

For a long time now, I have kept a simple notepad on the fridge. It's not a blank one, but it says each day of the week, Sunday through Saturday. Day-of-the-week notepads can normally be found at the dollar store. The weeks that I sit down and plan out a realistic menu are the weeks that I find we do well with our food spending and we don't give in to the "let's just go out to eat" thoughts.

Here is what I do. Sit down, decide what you may have in your pantry, or a recipe you've been meaning to try, or whatever your approach. You may also, if you have kids, need to look at the school lunch menu so you don't end up making something very similar for dinner the night before or the night of. Think also about the time you need to spend on each recipe/meal. Then, thinking about your schedule for the week, begin assigning meals to days of the week. If you know you have ballet on Tuesday, then make it leftovers night. If you have all afternoon Sunday to make a big meal, schedule that new recipe. Make it work for you.

Then, flip the paper over and make out your grocery list. Scan your recipes that you have planned. Is there anything from the recipes that you don't have in the pantry or fridge? Now's your chance to write it down. Look at your basic needs for groceries at the same time. Milk, bread...

Go shopping. Use the list. Stick to the list as closely as you can. I know, there's always something that catches your eye at the store. Oooh, it's shiny! Oh, it sparkles! The point is, if you need it, go ahead and get it.

This method of planning works really well for me, and with practice, it can work well for you, too! I found a website that is currently offering a "Fridge Friend" for free if you want to try this out, it even has a section to make out your grocery list on the front and a few tips on each page!
PS. The flowers above are red Verbena and are very hardy in full sun, here in the south!

Tuesday, July 14, 2009

Dinner for friends... and a great standby meal!

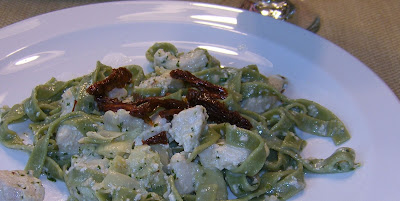
We had some friends come for dinner this past weekend. I decided to make an "old standby" that is well loved at our house. Not sure if I recall the origination of the pesto recipe, but because it has lime in it, I paired it with a unique limeade and a simple fruity dessert.

Cilantro-Lime Pesto Pasta
  • 1 cup fresh cilantro leaves (stems removed)
  • 3-4 tablespoons extra virgin olive oil
  • 2-3 tablespoons sliced, toasted almonds
  • 3 tablespoons chopped or minced fresh garlic
  • 2-3 teaspoons lime juice
  • 1 cup shredded asiago for pesto, plus 1/2 cup shredded for serving
  • 1 1/2 teaspoon salt
  • 1/2 cup organic chicken broth
  • 8 cups spinach linguini, cooked
  • 2 cups cooked, cubed chicken
  • 1 cup sun-dried tomato, sliced julienne
So you've cooked your chicken and linguini. Combine cilantro through broth in a food processor until blended. Stir pesto sauce into pasta and chicken. Top with sun-dried tomatoes.

I have varied this recipe over time, such as substituting tuna steak for the chicken, or adding artichoke hearts for a veggie right in the dish. This makes a great one-dish meal.

Minted Honeydew Limeade
  • 1 ripe honeydew melon
  • 1 cup sugar
  • 1 3/4 cups fresh lime juice
  • 3 tablespoons chopped fresh mint leaves
  • 3 cups cold water
  • Ice cubes
Blend the melon, in batches until liquified. Mix together the melon liquid with remaining ingredients (through water) in the blender. Serve on ice. Very refreshing!

The trifle was the simplest thing, I picked up some fresh farmer's market peaches, blueberries and strawberries from the store. Also picked up a store bakery angel food cake. I made a package of instant vanilla pudding. I also used whipped cream. Layer in a trifle bowl. Very easy to do and always great to eat.
I feel like this was a nice light meal, but great and not difficult to make, so you can enjoy yourself, your family and/or your guests!

Friday, July 10, 2009

Cantaloupe in a new light

Another fantastic reason to support local farmers: fresh cantaloupe! I bought a huge one this week and it was fresh, tender, sweet, and ready for us to sink our teeth into.

Our family just can't eat a whole cantaloupe. What to do?

Cantaloupes are great because they hold their shape well and don't release their liquid quickly (like watermelons, for instance). So, while with watermelon it's better to liquefy and pour into popsicle molds, an easy thing to do to preserve that wonderful cantaloupe [and it's perfect in-season flavor] is to freeze large chunks on a popsicle stick. They are just as yummy frozen, and quite refreshing as a popsicle. The first bites are a bit hard, but once it's been out for a minute or two, it's perfect.

I recommend getting a cookie pan, and laying a sheet of parchment paper on it. For each large chunk of cantaloupe, put a popsicle stick in about halfway. Lay the cantaloupe in a way that the least amount of fruit is touching the paper, and not touching each other. Freeze. Once frozen, remove from the paper and place in a freezer safe zipper bag, and place back in the freezer until ready to enjoy.

The pic on the right shows frozen cantaloupe pops that are ready to come off the paper and be placed into a bag then back to the freezer! Hope you'll try this next time you have too much cantaloupe!

Wednesday, July 8, 2009

Easy BBQ Pork Tenderloin

This meal is great for the family-on-the-go. The tenderloin comes out pretty tender, even cooked in the microwave using the instructions below. You can't do "pulled pork" with this version, but it cuts very easily, even with a butter knife.

I've never been a huge fan of BBQ sauce, but I did find a brand that I like, Cattlemen's. Alton Brown of the Food Network actually featured this brand on a show once, and said that it is used in many restaurants across the country. They sell it in a huge jug at Sam's Club. I got roped in once when they were sampling it. Since I have a deep freezer, I bought it, and froze it in zipper bags. If you're freezing BBQ sauce for future use, layer the bags flat on top of each other. Freezing the bags of sauce flat is also great for defrosting, which is very fast if the bag is thin.

One more note: I did this with the Pampered Chef Deep Covered Baker, which is a stone, although I believe that it would work with any covered casserole that is microwave safe. It should fit the length of the tenderloin and not be squished in, nor should the liquid completely cover the meat, but rather come about halfway up.

Easy BBQ Pork Tenderloin

1 cup of your favorite BBQ sauce
1 cup water
1 pork tenderloin

Season your pork tenderloin and trim the fat off. In a microwaveable casserole dish (that has a lid), stir the water and sauce together. Add the tenderloin, coating on all sides. Cover and microwave for 10 minutes on high. Keep covered and let sit until ready to eat, up to 30 minutes.

Great (and healthy) served with black beans and corn, but get creative and do what fits your family!

Were you wondering about the picture? If you're hosting a formal meal, you can visit eHow here to see how to properly set the table. Au revior!

Friday, July 3, 2009

Summertime and Watermelon

Watermelon is so refreshing in the summertime, and I can't think of a better treat at a cookout than cold watermelon!

Last summer I bought a seedless watermelon at the local farmer's market so that our family could enjoy it.
I found that we were up to our ears in watermelon, and didn't want to waste it! So I decided to try something that just popped into my head at that moment.

I began cutting up the watermelon into large chunks, removing and discarding the rind. I then put the chunks into the blender and gave it a whirl, until it was liquified. I proceeded to pour the watermelon puree into ice cube trays and place them into the freezer. Once frozen, I put the cubes in freezer baggies.

Ideas for Watermelon ice cubes:
  • Use in place of frozen strawberries in your next fruit smoothie
  • Add to your lemonade/limeade as the ice for a FUN new flavor
  • Make a watermelon daiquiri (no need for ice, the cubes work as both your fruit and your ice!)

I also poured some watermelon puree into popsicle molds. I added NOTHING and my family was able to enjoy the great taste of watermelon, as a healthy treat on a hot day!

So next time you head to the grocery store or farmer's market, don't avoid the watermelon because of it's size, and don't throw any out when you're done eating it- get creative with the leftovers!